📚 Complete Tutorial: Medical Chatbot Configuration with AI Engine

*This is the second part of the complete medical chatbot configuration guide. If you missed the first part where we covered the basic system structure, [you can find it here]**

In the first part, we configured:
✅ **Token System and Cost Optimization**
✅ **Medicine Database (JSON)**
✅ **Dashboard Modules (Client, Server, Admin)**
✅ **Chatbot Configuration (AI Model, Embeddings, Thresholds)**

## 🎨 NOW WE WILL FINALIZE THE INTERFACE:

In this part, we will transform the chatbot from a technical engine into a friendly medical experience by covering:

🔹 **”Appearance” Tab** – The visual design of the medical assistant
🔹 **”Popup” Tab** – Display methods in the digital clinic
🔹 **UI Builder** – Advanced interface customization
🔹 **Advanced** – Settings for professional use
🔹 **Cross-Site** – Multiple implementation
🔹 **Shortcodes** – Quick integration into medical pages
🔹 **Actions** – Intelligent automations
5. “APPEARANCE” TAB – MEDICAL INTERFACE DESIGN

📍AI Engine → Chatbots → [Chatbot Name] → “Appearance” Tab


🎨 THEME AND DISPLAY CONFIGURATION:

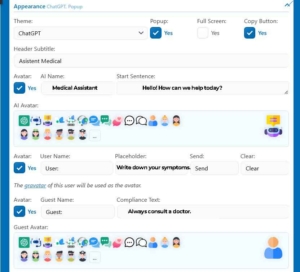
Theme: ChatGPT (✅ Selected)
Popup: Yes (✅ Checked)
Full Screen: ❌ Not Checked
Copy Button: Yes (✅ Checked)

🔍 INTERFACE SETTINGS ANALYSIS:

🤖 MEDICAL ASSISTANT CONFIGURATION:

Header Subtitle: "Medical Assistant" (✅ Text entered)
AI Name: "Medical Assistant" (✅ Text entered) 
Start Sentence: "Hello! How can I help you today?" (✅ Text entered)
AI Avatar: ✅ Avatar selected (specific letter)

👤 AUTHENTICATED USER CONFIGURATION:

User Avatar: ✅ Yes (Checked)
User Name: "User" (✅ Text entered)
Placeholder: "Write symptoms or n" (✅ Text entered)
Send: "Send" (✅ Text entered) 
Clear: "Clear" (✅ Text entered)

🚨 GUEST CONFIGURATION:

Guest Name: ✅ Yes (Checked) + "Guest" (text)
Compliance Text: "Always consult a doctor !" (✅ Text entered)
Guest Avatar: ✅ Avatar selected

🎯 DISPLAY STRATEGY:

📱 FULL SCREEN DISABLED – BENEFITS:

Normal Popup:
  - Conversation in a compact window
  - User continues to see the site content
  - Less intrusive experience
  - Ideal for quick medical consultations

💊 CUSTOM AVATARS:

AI Avatar: ✅ Specific avatar selected
User Avatar: ✅ User Gravatar
Guest Avatar: ✅ Generic avatar selected

Purpose:
  - Clear differentiation between participants
  - Consistent visual identity

✅ CONFIGURATION CHECKED CORRECTLY:

 Checked: Popup, Copy Button, User Avatar, Guest Name
❌ Unchecked: Full Screen
✅ Avatar: AI Avatar selected, Guest Avatar selected
✅ Texts: All medical texts completed

The configuration creates a professional, non-intrusive medical chat experience, with clear distinction between authenticated users and visitors.


6. “POPUP” TAB – MEDICAL DISPLAY STRATEGY

📍 AI Engine → Chatbots → [Chatbot Name] → “Popup” Tab


🎯 MEDICAL POPUP CONFIGURATION:

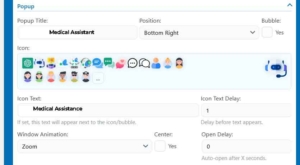
Popup Title: "Medical Assistant" (✅ Set)
Position: "Bottom Right" (✅ Selected)
Bubble: "Yes" (✅ Enabled)
Icon: ✅ Selected (specific image)

🔍 DISPLAY SETTINGS ANALYSIS:

📍 STRATEGIC POSITIONING:

Position: Bottom Right
Medical Benefits:
  - Quick access from any page
  - Minimal interference with medical content
  - Visible but discreet for patients
  - Mobile device compatible

💬 MEDICAL BUBBLE CONFIGURATION:

Bubble: Yes (✅ Enabled)
Icon Text: "Medical Help" (✅ Set)
Icon Text Delay: "1" second (✅ Set)

Functionality:
  - Bubble with icon always visible
  - Text "Medical Help" appears after 1 second
  - Clearly invites medical interaction
  - Instant identification of the assistant

🎬 ANIMATION AND DELAY:

Window Animation: "Zoom" (✅ Selected)
Center: "Yes" (✅ Enabled)
Open Delay: "0" seconds (✅ Set)

User Impact:
  - Instant opening on click
  - Professional zoom animation
  - Window centered on the screen
  - Modern and fast experience

🏥 MEDICAL ACCESSIBILITY STRATEGY:

⚡ INSTANT ACCESS FOR EMERGENCIES:

Open Delay: 0 seconds
Medical Purpose:
  - Immediate access to the medical assistant
  - Important for quick symptom description
  - No delays in critical situations
  - Prompt response to patient needs

🔍 EASY RECOGNITION:

Icon Text: "Medical Help"
1-second Delay:
  - Avoids initial visual clutter
  - Allows the user to orient themselves
  - Appears fast enough for guidance
  - Clear and concise message

✅ FINAL CONFIGURATION:

✅ Popup Title: "Medical Assistant"
✅ Position: Bottom Right
✅ Bubble: Yes + Icon selected
✅ Icon Text: "Medical Help" + Delay 1s
✅ Animation: Zoom + Center Yes
✅ Open Delay: 0 seconds

The configuration creates a clear and quick visual access point to the medical assistant, optimized for an efficient user experience in a medical context.


7. “UI BUILDER” TAB – MEDICAL INTERFACE CONSTRUCTOR

📍 AI Engine → Chatbots → [Chatbot Name] → “UI Builder” Tab


🎨 INTERFACE COMPONENTS CONFIGURATION:

Container: Standard (✅ Selected)
Messages: Standard (✅ Selected) 
Footer: Standard (✅ Selected)
Header: Standard (✅ Selected)
Input: Standard (✅ Selected)

🔍 INTERFACE STRUCTURE ANALYSIS:

🏗️ COMPONENT ARCHITECTURE:

Container: Standard
Function: The main frame of the chat window
Characteristics:
  - Standard window style
  - Container for all other components
  - Consistent and professional design

💬 MEDICAL MESSAGES AREA:

Messages: Standard
Function: Displaying the medical conversation
Characteristics:
  - Dedicated area for message exchange
  - Clear structure between assistant and user
  - Optimized format for medical information

🏥 INFORMATIVE FOOTER:

Footer: Standard
Function: Displaying compliance text and tools
Content:
  - Message "Always consult a doctor !"
  - Auxiliary buttons and tools
  - Legal and security information

📋 PROFESSIONAL HEADER:

Header: Standard
Function: Title bar with controls
Elements:
  - Title "Medical Assistant"
  - Control buttons (minimize, close)
  - Assistant avatar and identifier

⌨️ SYMPTOM INPUT FIELD:

Input: Standard
Function: Field for entering symptoms
Characteristics:
  - Placeholder "Write symptoms or n"
  - "Send" and "Clear" buttons
  - Optimized for medical descriptions

🎯 MEDICAL INTERFACE STRATEGY:

💊 OPTIMIZED USER FLOW:

Header → Messages → Input → Footer
    ↓         ↓         ↓       ↓
Assistant Conversation Symptom Medical
Identification Medical Input Warning

⚡ BENEFITS OF STANDARD SETTINGS:

Consistency: Uniform interface across all devices
Accessibility: Clear and easy-to-use elements
Professionalism: Serious and credible medical appearance
Compatibility: Works perfectly with the ChatGPT theme

✅ CONFIGURATION FINALIZED:

✅ Container: Standard
✅ Messages: Standard  
✅ Footer: Standard
✅ Header: Standard
✅ Input: Standard

Image of AI Engine UI Builder Tab Configuration Summary


8. “CROSS-SITE” TAB – PRACTICAL UTILITY

🎯 WHAT THIS TAB DOES:

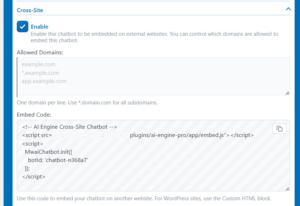
Main Function: Allows displaying the same chatbot on MULTIPLE sites
Analogy: Like an embedded YouTube video - same content, multiple locations

🏥 PRACTICAL MEDICAL SCENARIOS:

🏢 CLINIC WITH MULTIPLE SITES:

Situation: A clinic has:
  - Main site: clinicamedicala.ro
  - Educational blog: blog.clinicamedicala.ro  
  Platformă pacienți: app.clinicamedicala.ro
  Branch site: filiala.clinicamedicala.ro

Cross-Site Solution:
  - A single configured chatbot
  - The same medical assistant on ALL sites
  - Centralized conversation history

🤝 MEDICAL NETWORK:

Situation: Medical association with:
  - Association site: asociatiamedicala.ro
  Conference site: conferinta.asociatiamedicala.ro
  Member portal: membri.asociatiamedicala.ro

Benefit: The same medical expert for all members

💰 ECONOMIC BENEFITS:

✅ A single AI Engine subscription
✅ A single medical configuration
✅ Centralized maintenance
✅ Simultaneous updates on all sites

🚫 WHY IT IS NOT USED:

The Reason : ONE single medical site
Simplification: 
  - Single site = Cross-Site unnecessary
  - Better to disable for security
  - Avoids unnecessary complexity

🎪 EASY-TO-UNDERSTAND ANALOGY:

❌ WITHOUT Cross-Site: 
  - Each site has a SEPARATE chatbot
  - Like having different assistants in each room

✅ WITH Cross-Site:
  - The same assistant in all rooms
  - He knows all your medical history
  - Consistent and efficient


9. “SHORTCODES” TAB – FLEXIBLE IMPLEMENTATION

📍 AI Engine → Chatbots → [Chatbot Name] → “Shortcodes” Tab


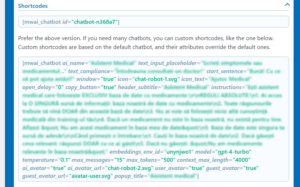
📋 AVAILABLE SHORTCODES:

🎯 SIMPLE SHORTCODE (RECOMMENDED):

[mwai_chatbot id="chatbot-n368a7"]

Benefits:

  • Uses all settings from the graphical interface

  • Automatic updates upon modifications

  • Minimal and easy to use

⚙️ ADVANCED SHORTCODE (CUSTOM):

[mwai_chatbot ai_name="Medical Assistant" 
 text_input_placeholder="Write symptoms or medicine..."
 text_compliance="Always consult a doctor!"
 start_sentence="Hello! How can I help you today?"
 window="true"
 # ... + all other settings]

Usage:

  • Override default settings

  • Customization for specific pages

  • Maximum flexibility


🎯 IMPLEMENTATION STRATEGY:

🏥 FOR SPECIFIC PAGES:

"Medical Emergencies" Page:
  - More urgent start sentence: "Hello! What symptoms do you have?"
  - More visible compliance text

"General Consultations" Page:
  - Standard start sentence: "Hello! How can I help you today?"

💊 SHORTCODE BENEFITS:

✅ Flexibility: Different settings on different pages
✅ Portability: You can easily move the chatbot
✅ Testing: You can test different variations
✅ Backup: If the graphical interface gives an error, the shortcode works

🔧 PRACTICAL UTILITY:

📍 WHERE TO USE:

In the WordPress Editor:
  - "Shortcode" Block
  - Paste [mwai_chatbot id="chatbot-n368a7"]
  - Save and the chatbot displays

In PHP Templates:
  - <?php echo do_shortcode('[mwai_chatbot id="chatbot-n368a7"]'); ?>


10. “ACTIONS” TAB – ADMINISTRATIVE OPERATIONS

📍 AI Engine → Chatbots → [Chatbot Name] → “Actions” Tab


🛠️ AVAILABLE ACTIONS

Duplicate: ✅ Creates an identical copy of the chatbot
Reset: ✅ Restores default settings (DANGEROUS)
Delete: 🗑️ Permanently deletes the chatbot (IRREVERSIBLE)

🔍 ACTIONS ANALYSIS:

📋 DUPLICATE – SMART CLONING:

Utility: 
  - Testing new settings without risk
  - Variants for different specializations
  - Backup before major modifications

Medical Scenarios:
  - Duplicate for "Pediatric Assistant"
  - Duplicate for "Chronic Disease Consultant"
  - Test new prompts on the copy

⚠️ RESET – RESTORING SETTINGS:

Attention: THIS IS A DANGEROUS BUTTON
What it does:
  - Deletes ALL custom settings
  - Reverts to default configurations
  - You lose the custom medical prompt
  - You lose database connections

When to use:
  - Only if you have corrupted the configuration
  - Never after you have configured everything

🗑️ DELETE – PERMANENT ELIMINATION:

Attention: IRREVERSIBLE ACTION
What happens:
  - The chatbot is permanently deleted
  - All settings are lost
  - Conversation history is kept (if enabled)

When to use:
  - Abandoned projects
  - Obsolete tests
  - Administrative cleanup

Image of AI Engine Actions Tab with Duplicate, Reset, and Delete buttons


📚 CONTINUATION IN PART 3

We have successfully finalized the interface and integration system configuration. In the next article, we will move on to advanced monitoring and optimization:

🔹 “Discussions” Tab – Viewing and analyzing all conversations
🔹 “Knowledge” Tab – Managing knowledge bases and PDF uploads
🔹 “Insights” Tab – Real-time cost monitoring and query logs
🔹 “Settings” Tab – Global API configurations and environment management

[👉 Read Part 3: Advanced Monitoring and Optimization here]